默认网络请求方法
微信小程序,其网络请求模块提供了 wx.request() 方法,看了一下它的文档,这不就是 n 年前 jQuery 的 $.ajax() 吗?下面是微信官方关于 wx.request() 的例子:
1
2
3
4
5
6
7
8
9
10
11
12
13
| wx.request({
url: 'test.php',
data: {
x: '' ,
y: ''
},
header: {
'content-type': 'application/json'
},
success: function(res) {
console.log(res.data)
}
})
|
我们知道,小程序是支持 ES6 的,那么,支持 Promise 就不在话下。因此,我们可以使用 Promise 来封装一下 wx.request() 方法。
Promise 版本的网络请求封装
直接上代码:
1
2
3
4
5
6
7
8
9
10
11
12
13
14
15
16
17
18
19
20
21
22
23
24
25
26
27
28
29
30
31
32
33
34
35
36
37
38
39
40
41
42
43
44
45
46
47
48
49
50
51
52
53
54
55
56
57
58
59
60
61
62
63
64
65
66
67
68
69
70
71
72
73
| const baseUrl = 'https://api.example.com';
const http = ({ url = '', param = {}, ...other } = {}) => {
wx.showLoading({
title: '请求中,请耐心等待..'
});
let timeStart = Date.now();
return new Promise((resolve, reject) => {
wx.request({
url: getUrl(url),
data: param,
header: {
'content-type': 'application/json'
},
...other,
complete: (res) => {
wx.hideLoading();
console.log(`耗时${Date.now() - timeStart}`);
if (res.statusCode >= 200 && res.statusCode < 300) {
resolve(res.data)
} else {
reject(res)
}
}
})
})
}
const getUrl = (url) => {
if (url.indexOf('://') == -1) {
url = baseUrl + url;
}
return url
}
const _get = (url, param = {}) => {
return http({
url,
param
})
}
const _post = (url, param = {}) => {
return http({
url,
param,
method: 'post'
})
}
const _put = (url, param = {}) => {
return http({
url,
param,
method: 'put'
})
}
const _delete = (url, param = {}) => {
return http({
url,
param,
method: 'put'
})
}
module.exports = {
baseUrl,
_get,
_post,
_put,
_delete
}
|
使用方法
上面我们用 Promise 封装了微信小程序网络请求方法,下面的代码展示了如何使用该封装的方法:
1
2
3
4
5
6
7
8
9
10
11
12
13
14
15
16
17
18
| const api = require('../../utils/api.js')
api.get('list').then(res => {
console.log(res)
}).catch(e => {
console.log(e)
})
Promise.all([
api.get('list'),
api.get(`detail/${id}`)
]).then(result => {
console.log(result)
}).catch(e => {
console.log(e)
})
|
小程序登录解决方案
做一个应用,肯定避免不了登录操作。比如:用户的个人信息、用户订单、收藏列表等功能都需要用户登录之后才能操作。一般我们使用 token 来做标识。
用户登录过程
小程序并没有登录界面,使用的是 wx.login() 方法。wx.login() 会获取到一个 code,拿着该 code 去请求我们的后台会最后返回一个 token 到小程序这边,保存这个值为 token 每次请求的时候带上这个值。
关于前端接口鉴权,请参考本站文章 深入理解主流前端接口鉴权方法 JWT 部分内容。
一般还需要把用户的信息带上比如用户微信昵称,微信头像等,这时候就需要使用 wx.getUserInfo() 方法,这里涉及到一个用户授权的问题。
带上用户信息就够了吗?Too young too simple!我们的项目不可能只有小程序,相应的微信公众平台以及对应的 APP,我们需要把账号系统打通,让用户在我们的项目中的账户是同一个。这种情况,需要用到微信开放平台提供的 UnionID。
小程序登录的代码如下:
1
2
3
4
5
6
7
8
9
10
11
12
13
14
15
16
17
18
19
20
21
22
23
24
25
26
27
28
29
30
31
32
33
34
35
36
37
38
39
40
41
42
43
44
45
46
47
48
49
50
51
52
53
54
55
56
57
58
59
60
61
62
63
64
65
66
67
68
69
70
71
72
73
74
75
76
77
78
79
80
81
82
83
84
85
86
87
88
89
90
91
92
93
94
95
96
97
98
99
100
101
102
103
104
105
106
107
108
109
110
111
112
113
114
115
116
117
118
119
120
121
122
123
124
125
126
127
128
129
130
131
132
133
134
|
App({
onLaunch: function () {
console.log('App onLaunch');
var that = this;
wx.request({
url: 'https://api.example.com/' + that.globalData.subDomain + '/config/get-value',
data: {
key: 'mallName'
},
success: function(res) {
wx.setStorageSync('mallName', res.data.data.value);
}
})
this.login();
this.getUserInfo();
},
login : function () {
var that = this;
var token = that.globalData.token;
if (token) {
wx.request({
url: 'https://api.example.com/' + that.globalData.subDomain + '/user/check-token',
data: {
token: token
},
success: function (res) {
if (res.data.code != 0) {
that.globalData.token = null;
that.login();
}
}
})
return;
}
wx.login({
success: function (res) {
wx.request({
url: 'https://api.example.com/' + that.globalData.subDomain + '/user/wxapp/login',
data: {
code: res.code
},
success: function(res) {
if (res.data.code == 10000) {
that.registerUser();
return;
}
if (res.data.code != 0) {
wx.hideLoading();
wx.showModal({
title: '提示',
content: '无法登录,请重试',
showCancel: false
})
return;
}
that.globalData.token = res.data.data.token;
wx.setStorage({
key: 'token',
data: res.data.data.token
})
}
})
}
})
},
registerUser: function () {
var that = this;
wx.login({
success: function (res) {
var code = res.code;
wx.getUserInfo({
success: function (res) {
var iv = res.iv;
var encryptedData = res.encryptedData;
wx.request({
url: 'https://api.example.com/' + that.globalData.subDomain + '/user/wxapp/register/complex',
data: {
code: code,
encryptedData: encryptedData,
iv: iv
},
success: (res) => {
wx.hideLoading();
that.login();
}
})
}
})
}
})
},
getUserInfo: function() {
wx.getUserInfo({
success: (data) => {
this.globalData.userInfo = data.userInfo;
wx.setStorage({
key: 'userInfo',
data: data.userInfo
})
return this.globalData.userInfo;
}
})
},
globalData: {
userInfo: null,
subDomain: "35vu54u9vuiuvc546d",
token: null
}
})
|
用户授权
关于在小程序中用户授权的问题,可参考下面的流程图。
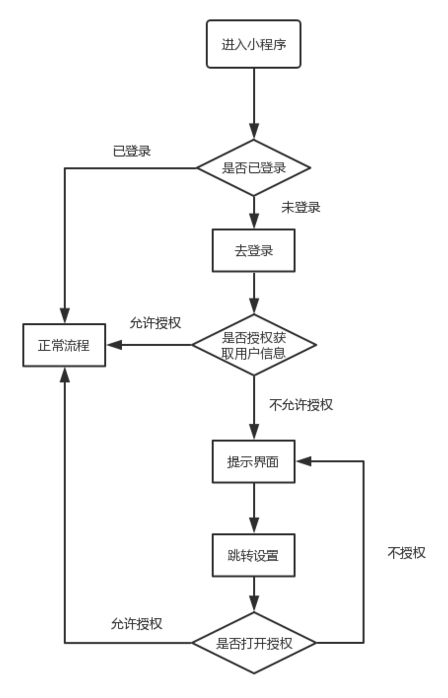
相关的代码如下:
1
2
3
4
5
6
7
8
9
10
11
12
13
14
15
16
17
18
19
20
21
22
23
24
25
26
27
28
| getUserInfo: function() {
wx.getSetting({
success(res) {
console.log('1');
if (!res.authSetting['scope.userInfo']) {
wx.authorize({
scope: 'scope.userInfo',
success() {
wx.getUserInfo({
success: (data) => {
this.globalData.userInfo = data.userInfo;
wx.setStorage({
key: 'userInfo',
data: data.userInfo
})
return this.globalData.userInfo;
}
})
}
})
} else {
console.log('Authorized!');
}
}
})
}
|
总结
本文详细阐述了微信小程序网络请求的封装及使用过程,并以小程序登录和授权过程作为网络请求的示例,希望大家能更好地理解微信网络请求相关方法。